Reducing Traffic by Using AWS IoT (Part 2 of 2)

In the previous post we saw how we used IoT to significantly reduce polling traffic to our servers. But there’s a twist. Some of our clients’ firewalls not only block incoming traffic, they also block outgoing traffic. Remember that for IoT to work the client must create a persistent connection to the AWS IoT servers — if that’s blocked we’re in trouble. Our clients are required to open their firewall to SysAid’s IPs, but we can’t require them to open themselves to all of AWS’ range. So what to do? If they can’t connect to the IoT servers they won’t be able to use our latest feature and will have to keep polling our overworked servers.
If only we could run IoT on our own servers, or at least redirect the traffic through our IPs. Well, as it turns out we can. IoT can use the MQTT protocol, but it can also run MQTT over HTTP websockets, which opens up the possibility of using an HTTP proxy. So now, instead of our server and client connecting to the IoT broker to pass messages, the client has to route the connection through a proxy, the proxy is in SysAid’s IP range and voila, problem solved.
'If only we could run IoT on our own servers, or at least redirect the traffic through our IPs.' Well... it turns out, we can. This blog explains how. #SysAid #Tech Share on X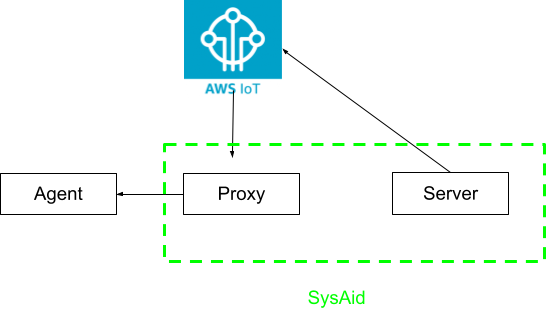
So now the question is how do we achieve this magic? The first thing to realize is that this complicates the security model somewhat.
Security infrastructure (authentication and authorization)

Yeah, that’s a lot to unpack. The security infrastructure (see diagram above) is composed of the following elements:
- Thing (the representation of our device on the AWS side)
- Certificate
- IoT security policy
- IoT role alias
- IAM role
- IAM policy
- IAM role trust policy
- IAM user
- Pass role policy
Here’s how it works: the Thing is connected to a certificate which is connected to an IoT policy. When our device authenticates to AWS using the certificate the IoT policy allows the Thing to assume an IoT role alias which points to an IAM role. The IAM role has a policy which allows a device to publish and subscribe to specific topics. Finally, you need an IAM user to pass the IAM role to IoT so the role alias can be created.
When the client connects to IoT, using the certificate, it:
- Connects to the regional IoT credential endpoint.
- Receives a temporary access key and secret.
- Connects to the regional IoT data endpoint and begins to send and receive messages.

That’s the cliff notes version of what’s going on (for a more detailed one read here), now let’s get down to implementation.
Implementation
The first step is the more challenging one, we have to create the authorization infrastructure, as described in the previous section. The second is much easier, we can use a demo application provided by AWS to send and receive messages.
Creating the security infrastructure
Here’s a Terraform script for creating all the authentication and authorization infrastructure described above. You’ll need to run terraform apply from the iam directory, and then run terraform apply again from the iot directory, because IoT is regional and IAM isn’t. Note that the security policies limit everything to a specific AWS region, which you can configure in the AWS provider block in the iam.tf file.
After running terraform apply from the iot directory you’ll be presented with output which looks like this:
"java -jar BasicPubSub-1.0-SNAPSHOT-jar-
–x509cert cert.pem –x509key cert.private_key –endpoint xxxxxxxx-ats.iot.eu-west-1.
–region eu-west-1 –x509 –x509rolealias iot-device-authorization-role-
–x509endpoint yyyyyyyy.credentials.iot.eu-
And that’s what you’ll have to run in order to send messages. Note that the script also creates the files cert.pem, cert.private_key and cert.public_key, all belonging to the certificate we created, and downloads the Amazon root CA into the file root.ca. So just to summarize:
- Run
terraform applyfrom the iam directory. - Run
terraform applyfrom the iot directory. - Run the java command which you get from the previous step.
Running the example application
The java code for the application can be found here in the class PubSub.java. Download it and run mvn package to create a runnable jar. Then use the command that resulted from running terraform apply (see above). You’ll be able to see messages being sent and received.
There are a few important things to note. First, it’s very important to enable websockets by using the -w switch. You can use websockets without a proxy, but not vice versa. Second, you can add the proxy information using the --proxyhost and --proxyport switches.
Troubleshooting
When things go wrong it can be hard to troubleshoot IoT. But there are several tools that can help.
First, you can check that when the application requests an access key and secret it receives them by issuing a curl --cert cert.pem --key private.key -H "x-amzn-iot-thingname: the-thing-name" .For this you’ll have to replace in the parameters the path to the PEM file, the path to the private key, the name of the Thing you’re using and your IoT credential endpoint.
Second, you can check connection to the data endpoint by issuing openssl s_client -connect yyyyyyyy-ats.iot.us-west-2.amazonaws.com:8443 -CAfile root.ca -cert cert.pem -key private.key. If it complains about the time you should synchronize the local server clock with ntpdate pool.ntp.org.
Third, if all of that seems ok, one final thing you can do is enable the CRT log. CRT is short for AWS Common RunTime, which is the native layer of the AWS IoT SDK. You enable logging by adding the following to the command running the java demo application: -Daws.crt.debugnative=true -Daws.crt.log.destination=File -Daws.crt.log.level=Info -Daws.crt.log.filename=crt.log. You’ll then get the log output in the file crt.log.
Does all this sound interesting? Great! I’m hiring a software architect. If you want to talk here’s a link to the job description: https://www.sysaid.com/company/careers/positions/co/rd/F4.22A/software-architect/all
Did you find this interesting?Share it with others:
Did you find this interesting? Share it with others:
Meet Dex: the autonomous IT engineer that eliminates tickets before they appear

SysAid’s AI Agent Center: Command and control for your AI Agents
How SysAid manages agents behind restricted firewall rules with AWS IoT Core


Microservices Architecture: Asynchronous Communication is Better